\

Facebook


แสดงบทความที่มีป้ายกำกับ winform แสดงบทความทั้งหมด

วันอังคารที่ 26 สิงหาคม พ.ศ. 2557

[Winform C#] ทำตัวอินสตอร์ด้วย Install Shield


หลังจากเขียนโปรแกรม Winform c# เรียบร้อยเเล้วถึงเวลาแปลงเป็นตัว exe ให้คลิกใช้ง่ายๆสักที ซึ่งจริงๆแล้วเพียงเรา copy ไฟล์ทั้งหมดใน โฟลเดอร์ bin/debug หลังจากบิ้วโปรเจกสำเร็จก็สามารถนำโปรแกรมไปใช้ได้แล้ว แต่วันนี้ผมจะลองทำเป็นตัว install ให้คลิกได้ง่ายๆกว่าเดิมครับ

เริ่มจากสร้างโปรเจกใหม่ คลิกขวาที่ solution > add > new project > other project types > setup and deployment เลือก InstallShield

ถ้าใช้งานครั้งแรกจะปรากฎหน้าต่างนี้

โดยถ้าเป็นการเริ่มใช้งานครั้งแรก จะปรากฎหน้าต่างตามนี้ครับ ให้เข้าไปดาว์นโหลดลงมาเเล้วไปสร้าง serial number เพื่อกลับมา regist ตามภาพครับ

serial number ของ installshield

หลังจาก Activate สำเร็จ จะได้หน้าต่างตามรูปเลยครับ


Activate สำเร็จ

โดยวิธีการตั้งค่าต่างๆ สามาารถเข้าโปรเจก setup1 เพื่อเช็ตค่าต่างๆได้ทันทีโดยแบ่งเป็นหมวดหมู่ดังนี้ครับ
1 Application Information เอาไว้กรอกรายละเอียดของไฟล์เซ็ตอัพ โดย
  - company name เป็นชื่อบริษัท
  - application name ชื่อแอปพลิเคชั่น
  - application version เลขเวอร์ชั่น
  - campany website เว็บส่วนตัวขององค์กรณ์


2 Install Requirement กำหนด spec ที่จำเป็นสำหรับ install โปรแกรม 
   - specific operating system  กำหนดได้ว่าควร Run Windows อะไร
   - Require software to be installed on the machine โปรแกรมอื่นๆที่จำเป็นในการ run กับโปรแกรมของเรา


3 Application shortcut กำหนด shortcut
4 Application Registry ต้องการให้ใช้ค่าตัวแปรจาก registry ก็ให้เซ็ตได้จากหน้าต่างนี้เลยครับ
5 Installation Interview ก่อนการ build กำหนดให้คนลงโปรแกรมสามารถกำหนด directory เองได้ไหม

สุดท้าย กด Build Project เป็นอันเรียบร้อยครับ
ทดลอง Install ดูได้ โดยเข้าไป directory ของโปรเจกค์ setup เเล้วหาโฟล์เดอร์ DISK

วันอาทิตย์ที่ 29 กันยายน พ.ศ. 2556

[WinForm c#] Basic send E-mail with Google Sevice


In this tutorial, I gonna show you how to implement basic WinForm with sending E-mail function. Gmail provide you STM port for sending new e-mail to another mail inbox, so we need Gmail account to access though this example code.

First, you must regist GOOGLE MAIL account to use their mail server service. If you have own hosting mail server, just get the same configuration of server side to apply this tutorial.

Google normally use port 587 for send and recieve fresh e-mail, and you can also use Class SmtpClient, which from System.Net.Mail, to declare nesessery property before start sending method.

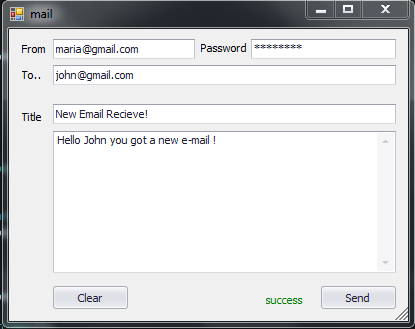
Create new project call "SendMail" and add new Form into solution, Add componets like sample images below. There are including textEdit controls, LabelEdit and button. Put into the same position and give them EventHandler . Into event simpleButton1_Click(), i should start tring send mail by get valus inside controls and put into MailMessage class and begin connection.


 Totally C# send mail method : 

MailMessage mail = new MailMessage();
                SmtpClient SmtpServer = new SmtpClient("smtp.gmail.com");

                mail.From = new MailAddress(textEdit1.Text);
                mail.To.Add(textEdit2.Text);
                mail.Subject = textEdit5.Text;
                mail.Body = memoEdit1.Text;

                SmtpServer.Port = 587;
                SmtpServer.Credentials = new System.Net.NetworkCredential(textEdit1.Text, textEdit3.Text);
                SmtpServer.EnableSsl = true;

                SmtpServer.Send(mail);
 
 
using System;
using System.Collections.Generic;
using System.ComponentModel;
using System.Data;
using System.Drawing;
using System.Linq;
using System.Net.Mail;
using System.Text;
using System.Threading.Tasks;
using System.Windows.Forms;

namespace SendEmail
{
    public partial class mail : Form
    {
        public mail()
        {
            InitializeComponent();
        }

        private void simpleButton1_Click(object sender, EventArgs e)
        {
            if (!CheckEmperty())
            {
                MessageBox.Show("Plesae fill all blank input form");
                return;
            }
            try
            {
                MailMessage mail = new MailMessage();
                SmtpClient SmtpServer = new SmtpClient("smtp.gmail.com");

                mail.From = new MailAddress(textEdit1.Text);
                mail.To.Add(textEdit2.Text);
                mail.Subject = textEdit5.Text;
                mail.Body = memoEdit1.Text;

                SmtpServer.Port = 587;
                SmtpServer.Credentials = new System.Net.NetworkCredential(textEdit1.Text, textEdit3.Text);
                SmtpServer.EnableSsl = true;

                SmtpServer.Send(mail);

                labelControl4.Text = "success";
                labelControl4.Appearance.ForeColor = System.Drawing.Color.Green;
            }
            catch (Exception ex)
            {
                labelControl4.Text = "fail";
                labelControl4.Appearance.ForeColor = System.Drawing.Color.Red;
            }
        }
        private bool CheckEmperty()
        {
            if (textEdit2.Text.Equals(""))
            {
                return false;
            }
            else if(textEdit1.Text.Equals(""))
            {
                return false;
            }
            else if (textEdit3.Text.Equals(""))
            {
                return false;
            }
            else if (textEdit5.Text.Equals(""))
            {
                return false;
            }
            else if (memoEdit1.Text.Equals(""))
            {
                return false;
            }
            
            return true;
        }

        private void simpleButton2_Click(object sender, EventArgs e)
        {
            textEdit1.Text = textEdit2.Text = textEdit3.Text = textEdit5.Text = memoEdit1.Text = "";
            labelControl4.Text = ": Result :";
            labelControl4.Appearance.ForeColor = System.Drawing.Color.Black;
        }
    }
}

วันพฤหัสบดีที่ 12 กันยายน พ.ศ. 2556

[WinForm c#] เบาๆกับโปรแกรม test SQL Connection อย่างง่าย


วันนี้ว่างๆ กับวันศุกร์ยมๆ (บรรยากาศเงียบๆ) ทดลองทำโปรแกรม ทดสอบคอนเน็คชั่นด้วย sql server 2008 r2 เพื่อตรวจสอบ connection string ว่าถูกต้องไหมก่อนจะใช้ดึงข้อมูลจากเบสต่อไป แต่ว่าการเทสคอนเน็กชั่นนั้น เราจะเทสแค่ทดสอบเชื่อมต่อกับ Host เท่านั้นว่ามีการตอบกลับมาไหม ไม่ได้เชื่อมต่อ database หรือ table อันไหนเลย

ดังนั้น Connection string ที่ใช้ก็คือ อักษรด้านล่างนี้เลยครับ
Connect Timeout=10;Pooling=false;Integrated Security=sspi;server=(local)
โดยเปลี่ยนคำว่า (local) ที่ท้ายของประโยคเป็น Host Name อื่นๆได้เช่น Url หรือ ip address ได้ แต่ผมไม่ได้ทดลองกับโฮสอื่นๆนะครับ แต่กับ (local) เทสได้แน่นอน แต่ผ่าน URL ลองแล้วมีปัญหา >> เดี๋ยวศึกษาเพิ่มเติมต่อไปเรื่อยๆละกัน

ต่อไปก็เริ่มต้นการคอนเน็คจริงๆสักที เริ่มต้นจากตรวจสอบข้อมูลที่กรอกลงไปทั้งหมดว่าถูกต้องแล้วหรือยัง ฟิลล์ที่จำเป็นคือ
Hostname, Username, Password, Database, Table

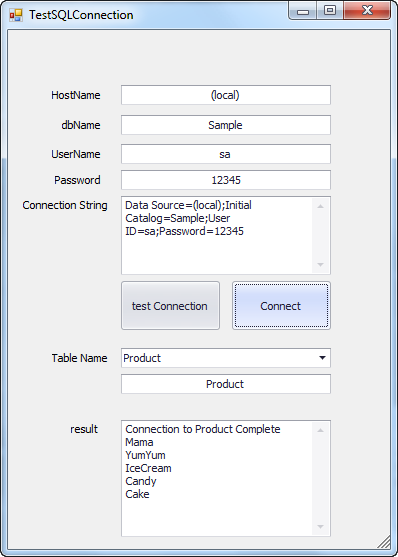
โปรแกรมอันนี้ถ้า test connect สำเร็จเเล้ว จะตั้งค่า default ของยูสเซอร์และพาสเวิร์ดให้อัตโนมัติ ถ้าไม่ได้เซ็ตตามค่าที่กำหนดไว้ก็แก้ไขให้ตรงด้วยนะครับ และนอกจากนี้จะทำการค้นหาตารางทั้งหมดที่อยู่ใน database ลูกนั้น เพื่อนำไปใส่ให้กับ combobox ตารางข้างล่าง ซึ่งคิวรี่ข้างในคือ

string query = "SELECT * FROM [dbo].[" + textTable.Text + "]";

โดยต้องกำหนดค่า table ด้วยนะครับไม่งั้นกด connect ยังไงก็พัง แต่ถ้าคอนเน็กสำเร็จ จะแสดงข้อมูลบน column ทั้งหมดในตารางออกมาที่ช่องผลลัพนะครับ เอาเป็นว่าวันนี้มันยมแท้ ขี้เกียจพิมพ์ต่อละ เอาโค๊ดไปแปะแล้วจัด control ต่างๆให้ต้องกับรูป design เป็นอันเสร็จสิ้นแล้วครับ


Code สมบูรณ์ ข้างล่างนี้ครับ

using System;
using System.Collections.Generic;
using System.ComponentModel;
using System.Data;
using System.Drawing;
using System.Linq;
using System.Text;
using System.Threading.Tasks;
using System.Windows.Forms;
using System.Data.SqlClient;
namespace ConsoleSqlConnect
{
    public partial class TestSQLConnection : Form
    {
        public TestSQLConnection()
        {
            InitializeComponent();
        }

        private void TestSQLConnection_Load(object sender, EventArgs e)
        {
            textHostName.Text = "(local)"; // set default for connection string [sql server]
            textdbName.Text = "Sample"; // set default 
            progressPanel1.Hide();
        }
        private void simpleButton1_Click(object sender, EventArgs e)
        {
            //test Connection
            progressPanel1.Show();
            ComboBoxTable.Properties.Items.Clear();
            memoResult.EditValue = string.Empty;
            string con = "Connect Timeout=10;Pooling=false;Integrated Security=sspi;server="+textHostName.EditValue;
            memoEdit1.Text = con;
            using (SqlConnection sqlconn = new SqlConnection(con))
            {
                try
                {
                    sqlconn.Open();
                    memoResult.EditValue = "Test Connect Complete"+System.Environment.NewLine+"Choose Database";
                    string query = "USE Sample SELECT * FROM sys.Tables";
                    SqlCommand cmd = new SqlCommand(query, sqlconn);
                    cmd.CommandType = CommandType.Text;
                    SqlDataReader read = cmd.ExecuteReader();
                    if (read.HasRows)
                    {
                        int num = -1;
                        while (read.Read())
                        {
                            ComboBoxTable.Properties.Items.Add(new DevExpress.XtraEditors.Controls.ImageComboBoxItem(read[0].ToString(), read[0].ToString(), num));
                            num++;
                        }
                        ComboBoxTable.EditValue = ComboBoxTable.Properties.Items[0].Value.ToString();
                        textUserName.Text = "sa"; // set default 
                        textPassword.Text = "12345"; // set default 
                    }
                    sqlconn.Close();
                }
                catch (SqlException ex)
                {
                    memoResult.EditValue = "Test Connect Fail";
                }
            }
            progressPanel1.Hide();
        }

        private void simpleButton2_Click(object sender, EventArgs e)
        {
            //connect Database
            progressPanel1.Show();
            string strConnect = "Data Source=" + textHostName.Text + ";Initial Catalog=" + textdbName.Text + ";User ID=" + textUserName.Text + ";Password=" + textPassword.Text;
            memoEdit1.Text = strConnect;
            using (SqlConnection sqlconn = new SqlConnection(strConnect))
            {
                try
                {
                    sqlconn.Open();
                    memoResult.EditValue = "Connection to " + ComboBoxTable.EditValue + " Complete" + Environment.NewLine;
                    string query = "SELECT * FROM [dbo].[" + textTable.Text + "]";
                    SqlCommand cmd = new SqlCommand(query, sqlconn);
                    cmd.CommandType = CommandType.Text;
                    SqlDataReader read = cmd.ExecuteReader();
                    if (read.HasRows)
                    {
                        while (read.Read())
                        {
                            memoResult.EditValue += read[1].ToString()+Environment.NewLine;
                        }
                         
                    }
                    sqlconn.Close();
                }
                catch (SqlException ex)
                {
                    memoResult.EditValue = "Connection Fail"+ex;
                }
            }
            progressPanel1.Hide();
        }

        private string GenStandardConnectionString()
        {
            //syntax : Server=myServerAddress;Database=myDataBase;User Id=myUsername;Password=myPassword;
            return "Server = " + textHostName.Text + "; Database = " + textdbName.Text + "; User Id = "+textUserName.Text+"; Password = "+textPassword.Text+";";
        }

        private void ComboBoxTable_EditValueChanged(object sender, EventArgs e)
        {
            textTable.Text = ComboBoxTable.Text;
        }
    }
}
ปล. ใช้ DevExpress 12 เป็นตัว design หน้าจอนะครับ Control ต่างๆก็จะ reference ด้วย Dev Express ถ้าใครใช้ Control เจ้าอื่นก็จัดให้ตรงด้วยนะครับ
วิธีใช้งาน
1 กด test Connection ถ้าผ่านจะขึ้น "Test Connect Complete"
2 เลือก Database ที่จะ connect
3 กด Connect เพื่อเชื่อมต่อ database
4 ตรง result จะเเสดงข้อมูลจากตารางที่เชื่อมต่อสำเร็จ

อ่านความรู้อื่นๆ [2weektrain2014]

วันพุธที่ 4 กันยายน พ.ศ. 2556

[โปรแกรม searchหาชื่อสินค้า] SQLite บน C# เอาไว้อ่านไฟล์ .db ใน WinForm มันง่ายมั่กๆ


วันก่อนผมเขียนเกี่ยวกับการสร้าง app ดึงข้อมูลจากฐานข้อมูล SQL Server 2008 r2 ไปแล้วซึ่งเขียนง่ายไม่ซับซ้อนแล้ว ผมว่ายังมีง่ายกว่านั้น แต่คราวนี้ผมต้องการดึง table จากไฟล์นามสกุล .db ลูกหนึ่งซึ่งค้นพี่ gooไปๆมาๆก็มาลงที่ SQLite {O_O} เอ๊ะนี้มีใช้เฉพาะเว็บไม่ใช่หรือ สรุปผู้พัฒนาเค้าสร้าง libary สำหรับใช้บน Win และ android มาด้วยซึ่งสะดวกเอามากๆ

sqlite เหมาะกับโปรแกรมที่ run แบบ stand alone และที่สำคัญ "ฟรี" โดยสามารถดาว์นโหลดไลบราลี่มาใช้งานได้ โดยการใช้งาน sqlite บน c# ก็ไม่ได้ใช้ code ที่สลับซับซ้อนเพราะ syntax คล้ายๆกับ sqlconnection นั่นแหละ


มาเริ่มกันเลยครับ Download libary .dll ตัวล่าสุดจาก Offical website ของ SQLite เค้าลงมา เลือกให้ถูกด้วยนะครับว่า จะเป็นแบบ 64 bit หรือ 32 bit หรือจะโหลดตัว install มาติดตั้งก็ได้ครับ ง่ายดี

หลังจากนั้น Install เลยครับ แล้ว add reference ให้ project ของเราซะ ตัวที่ต้องใช้งานมี
System.Data.SqlClient;
System.Data.SQLite;

เท่านี้เครื่องเราก็พร้อมใช้งานแล้วครับ ลุยขั้นตอนต่อไปเลย
เรื่อง connect string ศึกษาเพิ่มเติมได้ที่ website นี้ครับ http://www.connectionstrings.com/sqlite/ ซึ่งเค้ารวบรวม connection แบบต่างๆเอาไว้มีออฟชั่นเยอะแยะมากมาย แต่ผมขอเลือกแบบง่ายที่สุดก็เเล้วกัน

*หมายเหตุ เครื่องคอมผม ใช้windows 7 64 bit แต่เจอ error นี้เข้าไปหลังจากพยายามโหลด Libary ชื่อ SQLite.Interop.dll ซึ่งไปค้นหาทางแก้มา ได้ความว่าเราต้อง Prefer เป็น 64bit ถึงจะโหลดได้ >> ซึ่งต้องไป config เพิ่มที่ไฟล์ project (*.csproj) file ซึ่งคลิกขวา edit as EditPlus ได้เลยครับ แล้วเพิ่ม <Prefer32Bit>false</Prefer32Bit> เข้าไป ต่อท้ายใน tag <PropertyGroup>


แต่ถ้าไม่เจอปัญหานี้ก็รอดตัวไปครับ


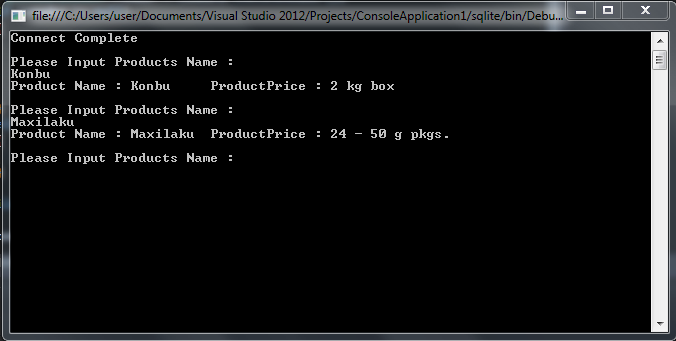
มาลุยโค๊ดกันเลยครับ >> ลองโค๊ดนี้กับการอ่านไฟล์ .db สักตัวนึง ถ้าใน Console Connect Complete ออกมาก็แสดงว่าเรา Connect ฐานข้อมูลสำเร็จแล้วครับ เพื่อทดลองดึงข้อมูล งั้นก็เอาฐานข้อมูลที่ sqlite แถมมาให้เลยละกัน [code ข้างล่างนี้]
using System.Text;

using System.Threading.Tasks;

using System.Data.SQLite;

namespace sqlite

{

    class MainClass

    {

        public static void Main(string[] args)

        {

            string dbfile = "C:\\northwindEF.db";

            string connStr = "Data Source=" + dbfile + ";Version=3;Synchronous=Off;UTF8Encoding=True;";

            SQLiteConnection sqlConn = null;

            sqlConn = new SQLiteConnection(connStr);

            try

            {

                sqlConn.Open();

                Console.WriteLine("Connect Complete, Please Input Product Name : ");

                Console.ReadLine();

            }

            catch (Exception ex)

            {

                Console.WriteLine("Error" + ex);

                Console.ReadLine();

            }

        }

    }

}


 หลังจากนั่นก็จัด query บ้านๆ ไปเลยครับ โค๊ด sql select ธรรมดาที่เอาไว้ search หาข้อมูลที่เรากรอกลงไปนั้นก็คือคิวรี่ข้างล่างนี้
string query = "SELECT ProductName, QuantityPerUnit FROM Products WHERE ProductName like '" + strInput+"'";

วันนี้ขอโปรแกรมง่ายๆก่อนละกัน คราวหลังถ้ามีเวลายาวๆ จะเขียนตัวอย่างให้ละเอียดมากกว่านี้นะครับ เอาพอเป็นแนวละกัน SQLite เป็นไลบราลี่ฟรีสามารดาว์นโหลดผ่านหน้าเว็บเค้า แล้วยังมีการออกอัพเดตใหม่ๆตลอดเวลา บายครับ

[Complete Code Example] สรุปตัวอย่างโค๊ดที่ใช้ในโปรแกรม C# sqlite Connect
using System;

using System.Collections.Generic;

using System.Linq;

using System.Text;

using System.Threading.Tasks;

using System.Data.SQLite;


namespace sqlite

{

    class MainClass

    {

        public static void Main(string[] args)

        {

            string dbfile = "C:\\northwindEF.db";

            string connStr = "Data Source=" + dbfile + ";Version=3;Synchronous=Off;UTF8Encoding=True;";


            SQLiteConnection sqlConn = null;

            sqlConn = new SQLiteConnection(connStr);


            try

            {

                sqlConn.Open();

                Console.WriteLine("Connect Complete");

                do

                {

                    Console.WriteLine("\nPlease Input Products Name : ");

                    string strInput = Console.ReadLine();


                    string query = "SELECT ProductName, QuantityPerUnit FROM Products WHERE ProductName like '" + strInput+"'";

                    SQLiteCommand command = new SQLiteCommand(query, sqlConn);

                    SQLiteDataReader reader = command.ExecuteReader();

                    if (reader != null)

                    {

                        while (reader.Read())

                        {

                            Console.WriteLine("Product Name : " + reader[0] + "\t ProductPrice : " + reader[1]);

                        }

                    }

                    else

                    {

                        Console.WriteLine("No Product");

                    }


                } while (true);


                sqlConn.Close();

            }

            catch (Exception ex)

            {

                Console.WriteLine("Error" + ex);

                Console.ReadLine();

            }

        }

    }

}

เป็น Console Application นะครับแต่ก็สามารถดัดแปลงให้เสดงเป็น UI สวยๆ ได้แค่เอาข้อมูลไปใสในกริดวิวของ Winform ที่เราเตรียมเอาไว้แสดงผล

วันพฤหัสบดีที่ 4 เมษายน พ.ศ. 2556

ระบบ LogIn ใน Windows Form Application


ระบบ LogIn ใน Windows Form Application ซึ่งผมได้สร้างข้อมูลใน Table “Users” ไว้แล้ว โดยมีข้อมูลดังนี้คือ
คอลัมม์ UserID: 1 ,
UserName: admin,
UserPassword: admin,
UserEmail: admin@admin.com

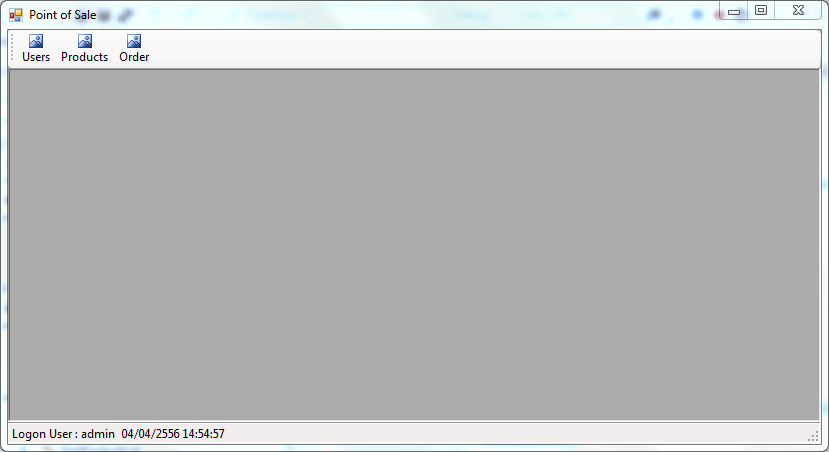
เริ่มต้นก็ทำการสร้างฟอร์มหลักขึ้นมา โดยคลิกขวาที่ชื่อโปรเจกค์ > add new item> windows form ตั้งชื่อ(Name) ว่า frmMain.cs ซึ่ง แล้วลากเอาคอมโพเน้นชื่อว่า MenuStrip กับ StatusbarStrip มาวางไว้ด้านบนและล่างของฟอร์มเพื่อเพิ่มชื่อ นาฬิกา

โดยหลักการ LogIn คือ ให้ฟอร์มของหน้า logIn เด้งขึ้นมาก่อนเพื่อรอการ Authentication หากล็อกอินสำเร็จก็จะผ่านเข้าสู่หน้าเมนหลัก แล้วแสดงชื่อของผู้ใช้งานในปัญจุบัน ภายใต้ status bar
เริ่มต้นโดยการสร้าง Windows Form ใหม่ขึ้นมาหนึ่งอัน คลิกลาก Label เข้ามาวางภายในฟอร์ม 2 อัน (Username กัน Password) และ EditText อีกสองอันเช่นเดียวกัน เพื่อให้ผู้ใช้กรอกข้อมูลทั้งหมด และปุ่ม OK และ Cancel ซึ่งเราจะเข้ามาสร้าง behavior ทีหลัง อ๋อ อย่าลืม ตั้งชื่อ (Name) ให้กับ text ด้วย
ดับเบิลคลิกที่ form เพื่อสร้าง ฟังชั่น On load


        private void frmMain_Load(object sender, EventArgs e)
        {
            this.Hide();
            timer1.Start();
            dlgLogin dlg = new dlgLogin();
            if (dlg.ShowDialog() == DialogResult.OK)
            {
                this.CurrentUser = dlg.CurrentUser;
                if (this.CurrentUser != null)
                {
                    lblLogonUser.Text = "Logon User : " + this.CurrentUser.Username;
                }
                this.Show();
            }
            else
            {
                Application.Exit();
            }
        }

ถ้า เราคลิกปุ่ม OK คลาส dlgLogin จะ return ค่า DialogResult.OK มีโค๊ดดังนี้

public partial class dlgLogin : Form
    {
        public User CurrentUser { get; set; }
        SampleEntities db;

        public dlgLogin()
        {
            InitializeComponent();
            db = new SampleEntities();
        }

        private void btnLogin_Click(object sender, EventArgs e)
        {
            // Authen user
            var result = from it in db.Users
                         where it.Username == txtUsername.Text && it.Password == txtPassword.Text
                         select it;


            if (result != null && result.Count() > 0)
            { // Pass
                CurrentUser = result.First();
                this.DialogResult = System.Windows.Forms.DialogResult.OK;
            }
            else
            {
                MessageBox.Show("Username หรือ Password ไม่ถูกต้อง", "Error", MessageBoxButtons.OK, MessageBoxIcon.Asterisk);
            }
        }

        private void btnCancel_Click(object sender, EventArgs e)
        {
            this.DialogResult = System.Windows.Forms.DialogResult.Cancel;
        }

        private void txtUsername_KeyUp(object sender, KeyEventArgs e)
        {
            if (e.KeyCode == Keys.Enter)
            {
                txtPassword.Select();
            }
        }

        private void txtPassword_KeyUp(object sender, KeyEventArgs e)
        {
            if (e.KeyCode == Keys.Enter)
            {
                btnLogin.PerformClick();
            }
        }
    }
โค๊ด LINQ ในการเช็คค่า username password คือ
var result = from it in db.Users
                         where it.Username == txtUsername.Text && it.Password == txtPassword.Text
                         select it;

แปลงได้ ภาษา SQL คือ “SELECT * FROM USERS WHERE USERNAME == username AND PASSWORD == password ซึ่งหากค่าที่ return กลับไม่เป็น 1 แสดงว่า มียูเซอนั้นและการ Authen สำเร็จ
กลับมาที่หน้า Class หลัก frmMain.cs เพื่อ ปุ่มลงไปข้างบน ชื่อว่า User  เพื่อดึงเอาข้อมูล User มาแสดง โดยสร้าง Class ใหม่ขึ้นมาชื่อว่า “frmUsers.cs” (add new item > windows form) ซึ่งมีโค๊ดดังนี้


using System;
using System.Collections.Generic;
using System.ComponentModel;
using System.Data;
using System.Drawing;
using System.Linq;
using System.Text;
using System.Threading.Tasks;
using System.Windows.Forms;

namespace SampleWinForm.Forms
{
    public partial class frmUserList : Form
    {

        public frmUserList()
        {
            InitializeComponent();
        }

        private void frmUserList_Load(object sender, EventArgs e)
        {
            DoLoadData();
        }

        private void DoLoadData()
        {
            using (var db = new SampleEntities())
            {
                List<User> users = (from it in db.Users
                                    select it).ToList();

                gridControl.DataSource = users;
            }
        }

        private void gridView_RowClick(object sender, DevExpress.XtraGrid.Views.Grid.RowClickEventArgs e)
        {
            List<User> users = gridControl.DataSource as List<User>;
            if (users == null)
                return;

            User user = users[gridView.FocusedRowHandle];
            frmUserInfo frm = new frmUserInfo();
            frm.UserID = user.UserID;
            if (frm.ShowDialog(this) == System.Windows.Forms.DialogResult.OK)
            {
                DoLoadData();
            }
        }

        private void btnAdd_Click(object sender, EventArgs e)
        {

            using(var db = new SampleEntities()){

                frmUserInfo frm = new frmUserInfo();
                frm.UserID = 0;

                if (frm.ShowDialog(this) == System.Windows.Forms.DialogResult.OK)
                {
                    DoLoadData();
                }

               }
           
           
        }
    }
}

ฟังชั่น DoLoadData จะถูกเรียกขึ้นใหม่ทุกครั้งเมื่อมีการเรียกใช้ และแสดงข้อมูลในกริด อย่าลืมสร้างปุ่ม add ไว้เพิ่ม user ใหม่ ซึ่งต้องสร้าง class ใมห่ชื่อว่า frmUserInfo.cs โค๊ดมีดังนี้


using System;
using System.Collections.Generic;
using System.ComponentModel;
using System.Data;
using System.Drawing;
using System.Linq;
using System.Text;
using System.Threading.Tasks;
using System.Windows.Forms;

namespace SampleWinForm.Forms
{
    public partial class frmUserInfo : Form
    {
        public int UserID = 0;
        SampleEntities db = new SampleEntities();

        public frmUserInfo()
        {
            InitializeComponent();
        }

        private void btnCancel_Click(object sender, EventArgs e)
        {
            DialogResult = System.Windows.Forms.DialogResult.Cancel;
        }

        private void btnSave_Click(object sender, EventArgs e)
        {
            User user = null;

            if (UserID == 0)
            {
                user = new User();
                db.Users.Add(user);
            }
            else
            {
                var result = (from it in db.Users
                             where it.UserID == UserID
                             select it).ToList();
                if (result.Count() > 0)
                {
                    user = result.First();
                }
            }

            user.Username = txtUsername.Text;
            user.Password = txtPassword.Text;
            user.Email = txtEmail.Text;
            if (db.SaveChanges() > 0)
            {
                DialogResult = System.Windows.Forms.DialogResult.OK;
            }
            else
            {
                MessageBox.Show("Save Failed.");
            }
        }

        private void frmUserInfo_Load(object sender, EventArgs e)
        {
            if (UserID > 0)
            {
                var result = (from it in db.Users
                              where it.UserID == UserID
                              select it).ToList();
                if (result.Count() > 0)
                {
                    txtUsername.Text = result.First().Username;
                    txtPassword.Text = result.First().Password;
                    txtEmail.Text = result.First().Email;
                }
            }
        }
    }
}

เดียวเพิ่มเติมให้กับหน้า LogIn >> บทความนี้ ละเอียดยังไม่พอ ยังไง ก็ติดตามกันด้วยนะครับ

May be like this posts