\

Facebook


วันศุกร์ที่ 26 เมษายน พ.ศ. 2556

เรื่องของ Delegate ในภาษา C# เรื่องนี้ ไม่เคยเจอเลยในตอนเรียน แต่มันก็ไม่ใช่ศาสตร์ขั้นสูงอะไรเลย แต่มีประโยชน์มาก เมื่อใช่ร่วมกับ Event ซึ่งตามคอนเซตที่ผมเข้าใจคือ "การรวบรวมเหตุการณ์(method) เข้าไว้เพื่อเรียกใช้งานในครั้งเดียว" ซึ่งเมทอดนั้นจะมาจากหลากหลาย class มาดูกันเลยดีกว่าว่าโค๊ดเขียนกันยังไง

ขั้นแรกก็เพียงประกาศ delegate เอาไว้...

ผมแปะโค๊ดไว้ก่อน เดี๋ยวมาอธิบายทีหลัง ตอนนี้ ไม่ว่าง ฮ่าๆๆ

using System;
using System.Collections.Generic;
using System.Linq;
using System.Text;
using System.Threading.Tasks;

namespace SampleDay1
{
    public class Program4
    {

        public static void Main(string[] args)
        {
            Person person1 = new Person() { name = "Sam" };
            Person person2 = new Person() { name = "Lula" };
            Person person3 = new Person() { name = "Billy" };
            Animals animal1 = new Animals() { name = "Dog" };

            Home home = new Home();
            home.OnFired += person1.PersonFired;
            home.OnFired += person2.PersonFired;
            home.OnFired += person3.PersonFired;
            home.OnFired += animal1.Bank;
            home.Fire();

            Func<int,int> fu = new Func<int,int>(DoSong);
            int result = fu.Invoke(2);

            Console.ReadLine();
        }
             public static int DoSong(int u)
            {
                Console.WriteLine("sdfdsf");
                 return 1;
            }
    }

        public class Home
        {
            public string color;
            public int height;
            public int width;

            public event OnFireHandler OnFired;

            public void Fire()
            {
                string ss = "h";
                if (OnFired != null)
                {
                    OnFired(ss);
                }
            }

            public void build(string chars)
            {
                Console.WriteLine("CH :" + chars);
            }

        }
        public class Person
        {
            public string name;
            public string PersonFired(string x)
            {
                Console.WriteLine(name + " said fire fire fire!!!"+ x);
                return null;
            }
        }
        public partial class Animals
        {
            public string name;

            public string Bank(string xx)
            { Console.WriteLine(name + "said Bank Bank Bank!!!" + xx); return null; }
        }

        public delegate string OnFireHandler(string str);
}

วันพฤหัสบดีที่ 25 เมษายน พ.ศ. 2556

Tip : เล็กๆกับการ Commit SVN


Trick เล็กๆน้อยกับการใช้งาน เต่า SVN :

จริงๆแล้วการแก้ไข ไฟล์เดียวกันในเวลาเดียวกันนั่น จำเป็นต้องบอกอีกฝ่ายด้วย เพื่อให้ไม่ commit ทับกัน โดยวิธีการก็ง่ายๆคือ ให้คนแรกแก้ไขให้เสร็จก่อน แล้วทำการ build ให้ผ่าน (หรือไม่มี error นั่นเอง) แล้วจึง Commit ไฟล์นั่นขึ้นไปบน SVN 
ต่อมา ค่อยให้อีกคน SVN Update ไฟล์ตัวล่าสุดลงมาก่อนแล้วจึงค่อยแก้ไข และ commit ตามวิธีการต่อไป

นอกจากนี้ การ SVN Update ในบางครั้งยังเกิดปัญหา โดยเฉพาะไฟล์ที่ modifier เท่านั้น ยกตัวอย่างเช่นไฟล์ Model ของ Entities Framework ของ Microsoft ที่ต้องมีการ Update อยู่บ่อยๆ

แนะนำให้ ลบ Folder ที่เก็บ model นั่นทิ้ง แล้ว SVN Update” จะดีกว่าเพราะ SVN จะเห็นว่าเครื่องเรานั้นยังไม่มีไฟล์ ดังนั้นจะทำการโหลดไฟล์ลงมาใหม่ทั้งหมดใน revision ล่าสุด ทำให้ใหม่สุดๆ สดสุดๆ
สำหรับไฟล์ที่แก้ไขคนเดียวก็ไม่ต้องห่วงเรื่อง commit เลย เพราะสามารถทำไฟล์ให้สมบูรณ์ก่อน(หรืออย่าให้เหลือ error ก็พอ แล้ว) แล้วค่อยคอมมิท เฉพาะไฟล์นั่นขึ้นไป ถ้าคนอื่น update svn ก็จะได้รับไฟล์ของเราไปคอมไพล์ด้วย

ปล. วันนี้เจอโค๊ดเล่นงานไป 1 บรรทัด >> หาแทบตาย สุดท้ายขาดแค่บรรทัดเดียว #เหนื่อย #กว่าจะเจอ #debugแทบตาย (commit SVN)

วันอังคารที่ 23 เมษายน พ.ศ. 2556

[OUTLOOK] เบื่อรับเมล์ปะปนกันไปหมดไหม? กรองมันซะเลย!


ขอโทษทีครับที่ช่วงนี้ ไม่ได้โพสบทความใหม่ๆเพิ่มเลย เอาเป็นว่าวันนี้มาสอนวิธีการทำฟิลเตอร์ e-mail  ที่โดยใช้โปรแกรม Microsoft Outlook 2010 ซึ่งมีประโยชน์มาก และใช้เป็นตัวช่วยจัดหมดหมู่ Email ให้แยกกลุ่มอย่างเป็นระเบียบ ถ้านึกภาพไม่ออกให้ลองนึกถึง เมลล์ขยะที่เมื่อถูกส่งเข้า Inbox เราปุ๊บก็จะถูกจับยัดลง Junk mail เฉยเลย >> เพราะมันมี ระบบ คอยตรวจสอบชื่อหัวเรื่องที่น่าจะเป็นเมลล์ขยะนั่นเอง
เราต้องสร้างกฎการจัดกลุ่ม โดยมีให้เลือก รูปแบบ คือ


1.       แบ่งตามรายชื่อผู้ส่ง (From) คือ ย้ายเข้ากล่องถ้ามีเมลล์มาจาก address ของคนนี้
2.       แบ่งตามคำในหัวเรื่อง (Title Contain) คือถ้ามีคำที่กำหนดในหัวเรื่องเมลล์ จะถูกย้ายเข้ากล่อง 

นอกจากนี้ยังกำหนดได้ด้วยว่าจะให้ส่งต่อเมลล์ไปยังผู้อื่นที่อยู่ใน Contract ของเราหรือไม่
ขั้นแรกคลิกขวาที่เมลล์ที่ต้องการกรอง หรือคลิกเมนูด้านบนโดยเลือก RULE | Create rule จะเห็นไดอะล็อก create rule และช่องให้ติกมากมายซึ่งมีดังนี้

-          From : คือเลือกว่าให้ฟิลเตอร์เฉพาะเมลล์ที่มาจากคนนี้เท่านั่น
-          Subject contain : คือฟิลเตอร์จากคำที่อยู่ในชื่อเรื่อง
-          Send to: คือส่งต่อให้คนอื่น

แล้วทำการเลือกโฟล์เดอร์ที่จะให้ทำการย้ายเมลล์ไปเก็บไว้ อย่างในตัวอย่างนี้เลือก Target Folder หรือจะสร้างโฟลเดอร์ขึ้นมาใหม่ก็ได้ คลิก OK

เลือก run this rule now on messages already on the current folder ถ้าต้องการให้นำกฎไปใช้กับทั้ง Inbox
เพียงเท่านี้ เมลล์ก็จะถูกจัดระเบียบสวยงาม เป็นหมู่ๆไป

วันพฤหัสบดีที่ 4 เมษายน พ.ศ. 2556

ระบบ LogIn ใน Windows Form Application


ระบบ LogIn ใน Windows Form Application ซึ่งผมได้สร้างข้อมูลใน Table “Users” ไว้แล้ว โดยมีข้อมูลดังนี้คือ
คอลัมม์ UserID: 1 ,
UserName: admin,
UserPassword: admin,
UserEmail: admin@admin.com

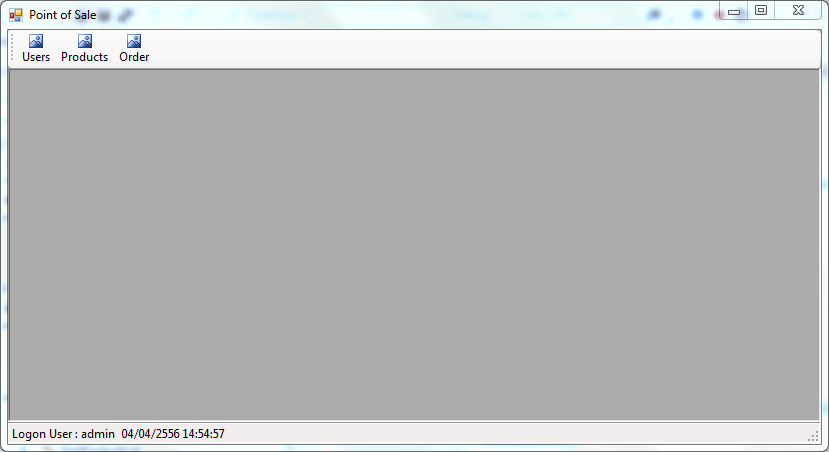
เริ่มต้นก็ทำการสร้างฟอร์มหลักขึ้นมา โดยคลิกขวาที่ชื่อโปรเจกค์ > add new item> windows form ตั้งชื่อ(Name) ว่า frmMain.cs ซึ่ง แล้วลากเอาคอมโพเน้นชื่อว่า MenuStrip กับ StatusbarStrip มาวางไว้ด้านบนและล่างของฟอร์มเพื่อเพิ่มชื่อ นาฬิกา

โดยหลักการ LogIn คือ ให้ฟอร์มของหน้า logIn เด้งขึ้นมาก่อนเพื่อรอการ Authentication หากล็อกอินสำเร็จก็จะผ่านเข้าสู่หน้าเมนหลัก แล้วแสดงชื่อของผู้ใช้งานในปัญจุบัน ภายใต้ status bar
เริ่มต้นโดยการสร้าง Windows Form ใหม่ขึ้นมาหนึ่งอัน คลิกลาก Label เข้ามาวางภายในฟอร์ม 2 อัน (Username กัน Password) และ EditText อีกสองอันเช่นเดียวกัน เพื่อให้ผู้ใช้กรอกข้อมูลทั้งหมด และปุ่ม OK และ Cancel ซึ่งเราจะเข้ามาสร้าง behavior ทีหลัง อ๋อ อย่าลืม ตั้งชื่อ (Name) ให้กับ text ด้วย
ดับเบิลคลิกที่ form เพื่อสร้าง ฟังชั่น On load


        private void frmMain_Load(object sender, EventArgs e)
        {
            this.Hide();
            timer1.Start();
            dlgLogin dlg = new dlgLogin();
            if (dlg.ShowDialog() == DialogResult.OK)
            {
                this.CurrentUser = dlg.CurrentUser;
                if (this.CurrentUser != null)
                {
                    lblLogonUser.Text = "Logon User : " + this.CurrentUser.Username;
                }
                this.Show();
            }
            else
            {
                Application.Exit();
            }
        }

ถ้า เราคลิกปุ่ม OK คลาส dlgLogin จะ return ค่า DialogResult.OK มีโค๊ดดังนี้

public partial class dlgLogin : Form
    {
        public User CurrentUser { get; set; }
        SampleEntities db;

        public dlgLogin()
        {
            InitializeComponent();
            db = new SampleEntities();
        }

        private void btnLogin_Click(object sender, EventArgs e)
        {
            // Authen user
            var result = from it in db.Users
                         where it.Username == txtUsername.Text && it.Password == txtPassword.Text
                         select it;


            if (result != null && result.Count() > 0)
            { // Pass
                CurrentUser = result.First();
                this.DialogResult = System.Windows.Forms.DialogResult.OK;
            }
            else
            {
                MessageBox.Show("Username หรือ Password ไม่ถูกต้อง", "Error", MessageBoxButtons.OK, MessageBoxIcon.Asterisk);
            }
        }

        private void btnCancel_Click(object sender, EventArgs e)
        {
            this.DialogResult = System.Windows.Forms.DialogResult.Cancel;
        }

        private void txtUsername_KeyUp(object sender, KeyEventArgs e)
        {
            if (e.KeyCode == Keys.Enter)
            {
                txtPassword.Select();
            }
        }

        private void txtPassword_KeyUp(object sender, KeyEventArgs e)
        {
            if (e.KeyCode == Keys.Enter)
            {
                btnLogin.PerformClick();
            }
        }
    }
โค๊ด LINQ ในการเช็คค่า username password คือ
var result = from it in db.Users
                         where it.Username == txtUsername.Text && it.Password == txtPassword.Text
                         select it;

แปลงได้ ภาษา SQL คือ “SELECT * FROM USERS WHERE USERNAME == username AND PASSWORD == password ซึ่งหากค่าที่ return กลับไม่เป็น 1 แสดงว่า มียูเซอนั้นและการ Authen สำเร็จ
กลับมาที่หน้า Class หลัก frmMain.cs เพื่อ ปุ่มลงไปข้างบน ชื่อว่า User  เพื่อดึงเอาข้อมูล User มาแสดง โดยสร้าง Class ใหม่ขึ้นมาชื่อว่า “frmUsers.cs” (add new item > windows form) ซึ่งมีโค๊ดดังนี้


using System;
using System.Collections.Generic;
using System.ComponentModel;
using System.Data;
using System.Drawing;
using System.Linq;
using System.Text;
using System.Threading.Tasks;
using System.Windows.Forms;

namespace SampleWinForm.Forms
{
    public partial class frmUserList : Form
    {

        public frmUserList()
        {
            InitializeComponent();
        }

        private void frmUserList_Load(object sender, EventArgs e)
        {
            DoLoadData();
        }

        private void DoLoadData()
        {
            using (var db = new SampleEntities())
            {
                List<User> users = (from it in db.Users
                                    select it).ToList();

                gridControl.DataSource = users;
            }
        }

        private void gridView_RowClick(object sender, DevExpress.XtraGrid.Views.Grid.RowClickEventArgs e)
        {
            List<User> users = gridControl.DataSource as List<User>;
            if (users == null)
                return;

            User user = users[gridView.FocusedRowHandle];
            frmUserInfo frm = new frmUserInfo();
            frm.UserID = user.UserID;
            if (frm.ShowDialog(this) == System.Windows.Forms.DialogResult.OK)
            {
                DoLoadData();
            }
        }

        private void btnAdd_Click(object sender, EventArgs e)
        {

            using(var db = new SampleEntities()){

                frmUserInfo frm = new frmUserInfo();
                frm.UserID = 0;

                if (frm.ShowDialog(this) == System.Windows.Forms.DialogResult.OK)
                {
                    DoLoadData();
                }

               }
           
           
        }
    }
}

ฟังชั่น DoLoadData จะถูกเรียกขึ้นใหม่ทุกครั้งเมื่อมีการเรียกใช้ และแสดงข้อมูลในกริด อย่าลืมสร้างปุ่ม add ไว้เพิ่ม user ใหม่ ซึ่งต้องสร้าง class ใมห่ชื่อว่า frmUserInfo.cs โค๊ดมีดังนี้


using System;
using System.Collections.Generic;
using System.ComponentModel;
using System.Data;
using System.Drawing;
using System.Linq;
using System.Text;
using System.Threading.Tasks;
using System.Windows.Forms;

namespace SampleWinForm.Forms
{
    public partial class frmUserInfo : Form
    {
        public int UserID = 0;
        SampleEntities db = new SampleEntities();

        public frmUserInfo()
        {
            InitializeComponent();
        }

        private void btnCancel_Click(object sender, EventArgs e)
        {
            DialogResult = System.Windows.Forms.DialogResult.Cancel;
        }

        private void btnSave_Click(object sender, EventArgs e)
        {
            User user = null;

            if (UserID == 0)
            {
                user = new User();
                db.Users.Add(user);
            }
            else
            {
                var result = (from it in db.Users
                             where it.UserID == UserID
                             select it).ToList();
                if (result.Count() > 0)
                {
                    user = result.First();
                }
            }

            user.Username = txtUsername.Text;
            user.Password = txtPassword.Text;
            user.Email = txtEmail.Text;
            if (db.SaveChanges() > 0)
            {
                DialogResult = System.Windows.Forms.DialogResult.OK;
            }
            else
            {
                MessageBox.Show("Save Failed.");
            }
        }

        private void frmUserInfo_Load(object sender, EventArgs e)
        {
            if (UserID > 0)
            {
                var result = (from it in db.Users
                              where it.UserID == UserID
                              select it).ToList();
                if (result.Count() > 0)
                {
                    txtUsername.Text = result.First().Username;
                    txtPassword.Text = result.First().Password;
                    txtEmail.Text = result.First().Email;
                }
            }
        }
    }
}

เดียวเพิ่มเติมให้กับหน้า LogIn >> บทความนี้ ละเอียดยังไม่พอ ยังไง ก็ติดตามกันด้วยนะครับ

May be like this posts