อันดับแรกให้ไปดาว์นโหลด PHPMailer เว่อร์ชั่นล่าสุดมาก่อนครับ(ปีที่เขียน 2014) ตามลิ้งนี้ เเล้วหาไฟล์ที่มีชื่อว่า PHPMailerAutoload.php จากนั้นในโค๊ด php เราจะ require ไฟล์นี้เข้ามาเพื่อเรียกใช้ class PHPMailer
จากนั้นเข้าบัญชี Google Account เข้าไปที่แท็ป https://www.google.com/settings/security แล้วหาบ็อก Account permissions จากนั้นคลิก enable ตั้งค่าให้ Access for less secure apps เพื่อเป็นการอนุญาติให้ app ภายนอกเข้าใช้งาน account เราได้
เราสามารถเลือก encryption system ได้ 2 แบบนั้นคือ
- ssl Port 465 (SSL required)
- tls Port 587 (TLS required)
จากนั้นตั้งค่าตัวแปรที่จำเป็นให้คลาสดังนี้
$mail->Host คือ stmp server ของกูเกิ้ลที่ใช้ส่งอีเมลล์
$mail->SMTPAuth การพิสูจน์ตัวตนด้วย username password
$mail->Username ชื่อเมลล์ที่จะล็อกอินเพื่อส่ง
$mail->Password พาส
$mail->addAddress ชื่อผู้ส่ง
$mail->Subject หัวเรื่อง
$mail->msgHTML ไฟล์ html ที่จะส่งไปผ่านเมลล์
$mail->AltBody รายละเอียดเมลล์
$mail->addAttachment ไฟล์แนบ
โค๊ดตัวอย่างดังนี้ครับ
<?php
/**
 * This example shows settings to use when sending via Google's Gmail servers.
 */

//SMTP needs accurate times, and the PHP time zone MUST be set
//This should be done in your php.ini, but this is how to do it if you don't have access to that
date_default_timezone_set('Etc/UTC');

require '../PHPMailerAutoload.php';

//Create a new PHPMailer instance
$mail = new PHPMailer;

//Tell PHPMailer to use SMTP
$mail->isSMTP();

//Enable SMTP debugging
// 0 = off (for production use)
// 1 = client messages
// 2 = client and server messages
$mail->SMTPDebug = 2;

//Ask for HTML-friendly debug output
$mail->Debugoutput = 'html';

//Set the hostname of the mail server
$mail->Host = 'smtp.gmail.com';

//Set the SMTP port number - 587 for authenticated TLS, a.k.a. RFC4409 SMTP submission
$mail->Port = 587;

//Set the encryption system to use - ssl (deprecated) or tls
$mail->SMTPSecure = 'tls';

//Whether to use SMTP authentication
$mail->SMTPAuth = true;

//Username to use for SMTP authentication - use full email address for gmail
$mail->Username = "username@gmail.com";

//Password to use for SMTP authentication
$mail->Password = "yourpassword";

//Set who the message is to be sent from
$mail->setFrom('from@example.com', 'First Last');

//Set an alternative reply-to address
$mail->addReplyTo('replyto@example.com', 'First Last');

//Set who the message is to be sent to
$mail->addAddress('whoto@example.com', 'John Doe');

//Set the subject line
$mail->Subject = 'PHPMailer GMail SMTP test';

//Read an HTML message body from an external file, convert referenced images to embedded,
//convert HTML into a basic plain-text alternative body
$mail->msgHTML(file_get_contents('contents.html'), dirname(__FILE__));

//Replace the plain text body with one created manually
$mail->AltBody = 'This is a plain-text message body';

//Attach an image file
$mail->addAttachment('images/phpmailer_mini.png');

//send the message, check for errors
if (!$mail->send()) {
    echo "Mailer Error: " . $mail->ErrorInfo;
} else {
    echo "Message sent!";
}
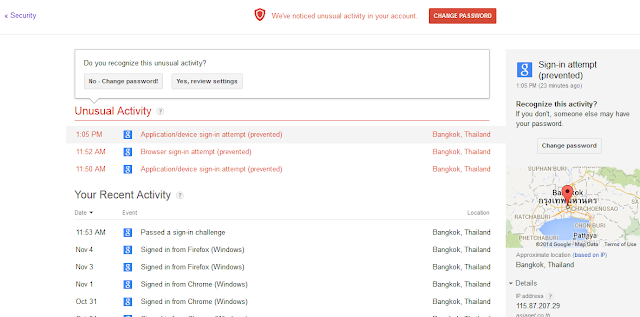
เพิ่มเติมเป็นเกร็ดความรู้ครับ เราสามารถตรวจสอบ log ของ gmail ได้ โดยจะแสดงการลงชื่อเข้าใช้แต่ละครั้งที่ตำแหน่งไหน และด้วย IP อะไร ซึ่งถ้ามีการลงชื่อจากแอพ หรือเหตุการณ์อะไรที่เป็นอันตรายกับบัญชีของเรา ก็จะแสดงให้เห็นด้วย ที่หน้าจอนี้https://security.google.com/settings/security/activity


ไม่มีความคิดเห็น:
แสดงความคิดเห็น